I’ll be honest with you — the first time I made strawberry oatmeal breakfast bars, I pulled a crumbly, falling-apart disaster out of the oven. The filling was soupy. The base was basically gravel. I stood in my kitchen at 7 a.m. eating it with a spoon directly from the pan and told myself it was “deconstructed.”
It wasn’t deconstructed. It was a failure.
But that disaster taught me everything I needed to know about what makes these bars actually work. Now? This is the recipe I make on autopilot every single Sunday. It takes about 45 minutes, fills my kitchen with this warm, jammy, buttery smell that I genuinely look forward to all week, and gives me grab-and-go breakfasts from Monday through Friday.
These strawberry oatmeal breakfast bars are for you if you’re tired of skipping breakfast because you’re rushing out the door. They’re for meal preppers, for parents packing lunchboxes, for anyone who wants something homemade that doesn’t require standing at a stove at 6:30 a.m.
One pan. Simple ingredients. Completely worth it.
Why These Strawberry Oatmeal Breakfast Bars Actually Work
A lot of breakfast bar recipes out there produce something either too dry and crumbly or weirdly gummy in the middle. Here’s what separates this version from the rest.
1. Cold Butter Is Non-Negotiable
I know it’s tempting to melt the butter because it’s faster. Don’t. Cold butter, cut into small cubes and worked into the oat mixture, creates tiny pockets of fat that steam during baking. That’s what gives you that incredible crumbly-yet-cohesive texture — almost like a shortbread crumble. Melted butter just makes everything dense and flat.
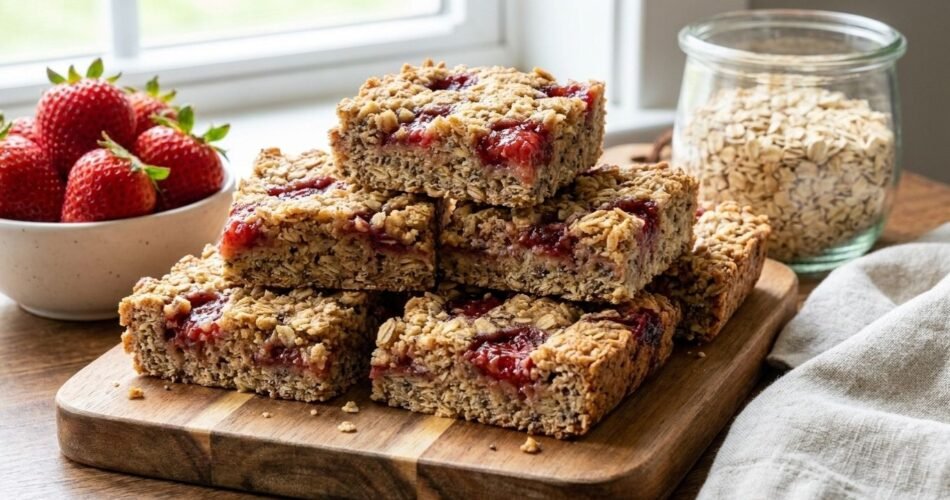
2. The Double-Layer Oat Technique
Instead of a separate crumble topping, this recipe uses one oat mixture pressed as the base and scattered loosely over the top. The pressed layer holds everything together. The loose top layer bakes into a gorgeous, craggy, golden crust. Simple and effective.
3. Cornstarch in the Filling Is the Real Secret
This is the fix I discovered after my soupy disaster. A teaspoon of cornstarch mixed into the strawberry filling thickens it as it bakes. You get clean, sliceable bars instead of a jammy mess that oozes everywhere the second you cut into them.
4. Let Them Cool Completely — Seriously
I know. It smells incredible. You want to cut into them immediately. If you do, they’ll fall apart in your hands. The filling needs to fully set as the bars cool to room temperature, and that takes at least 30 minutes. This is a hard-won lesson. Be patient.
5. A Touch of Almond Extract Changes Everything
Just a quarter teaspoon. It doesn’t make these taste like almonds — it just deepens the strawberry flavor in a way that makes people lean in and say “what is that?” It’s a tiny addition with an outsized impact.
Key Ingredients & Smart Substitutions
Old-Fashioned Rolled Oats — These are the backbone of the bars. They bake up chewy and substantial. Quick oats will work in a pinch but give you a finer, softer texture. Avoid steel-cut oats entirely — they won’t soften enough.
All-Purpose Flour — Holds the oat mixture together. For a gluten-free version, a 1:1 gluten-free baking flour blend works beautifully here.
Cold Unsalted Butter — Creates that crumbly, shortbread-like texture. For a dairy-free version, use cold vegan butter (I’ve tested this with Miyoko’s and it works great).
Brown Sugar — Adds a subtle molasses depth that white sugar just doesn’t give you. Light or dark both work — dark will make the bars richer and slightly chewier.
Fresh or Frozen Strawberries — Fresh strawberries in peak season are unbeatable. But don’t write off frozen — they actually break down into a more jammy filling. If using frozen, don’t thaw them first.
Cornstarch — Your filling’s best friend. Thickens everything up so your bars slice cleanly.
Lemon Zest — Brightens the strawberry filling and keeps it from tasting flat or overly sweet. Don’t skip it.
Vanilla Extract + Almond Extract — Vanilla is expected. The almond is the quiet star.
Honey or Maple Syrup (optional) — A tablespoon drizzled into the filling adds a floral sweetness. Entirely optional but lovely.
Step-by-Step Instructions
Step 1: Prep Your Pan and Oven
Preheat your oven to 350°F (175°C). Line an 8×8-inch baking pan with parchment paper, leaving a little overhang on the sides — this is your handle for lifting the bars out cleanly later. Lightly grease any exposed edges.
Chef’s Note: An 8×8 pan gives you thick, satisfying bars. If you use a 9×13, you’ll get thinner bars and need to reduce baking time by about 8–10 minutes.
Step 2: Make the Strawberry Filling
In a medium saucepan over medium heat, combine 2 cups of diced strawberries, 3 tablespoons of granulated sugar, 1 teaspoon of cornstarch, 1 teaspoon of lemon zest, and a squeeze of fresh lemon juice (about 1 teaspoon). Stir everything together before turning on the heat.
Cook, stirring occasionally, for about 8–10 minutes. You’re looking for the strawberries to break down, the mixture to thicken slightly, and the whole thing to look glossy and jam-like. It’ll smell incredible — sweet, bright, a little tart.
Remove from heat and stir in ¼ teaspoon of almond extract. Set aside to cool slightly while you make the oat mixture.
Chef’s Note: If your strawberries are very watery (this can happen with frozen berries), let the filling cook a couple of extra minutes. You want it thick enough that it mounds slightly on a spoon rather than running off it.
Step 3: Make the Oat Crumble Base
In a large bowl, whisk together:
- 1½ cups old-fashioned rolled oats
- 1 cup all-purpose flour
- ½ cup packed brown sugar
- ¼ teaspoon cinnamon
- ¼ teaspoon salt
Add ½ cup (1 stick / 113g) of cold unsalted butter, cut into small cubes. Using your fingertips or a pastry cutter, work the butter into the dry ingredients until the mixture resembles coarse, clumpy sand. Some pea-sized butter chunks are totally fine — even good.
Stir in 1 teaspoon of vanilla extract. The mixture will look crumbly and loose. That’s exactly right.
Chef’s Note: If the mixture feels too dry and won’t hold together even slightly when you pinch it, add cold water ½ teaspoon at a time until it just comes together. Don’t add too much or you’ll lose that crumbly texture.
Step 4: Assemble the Bars
Press about two-thirds of the oat mixture firmly and evenly into the bottom of your prepared pan. Use the flat bottom of a measuring cup to really pack it down — this base needs to be solid enough to hold the filling.
Spoon the strawberry filling evenly over the base, spreading it to the edges. Don’t worry if it looks like a lot of filling. It is. That’s a good thing.
Scatter the remaining oat mixture loosely over the top of the filling. Don’t press it down — just let it fall naturally into a rough, uneven layer. Those uneven bits will bake into craggy, golden clusters.
Step 5: Bake
Bake for 35–40 minutes, until the top is deep golden brown and the filling is bubbling around the edges. That bubbling is important — it tells you the filling has fully cooked and thickened.
Pull the pan from the oven and let it cool in the pan on a wire rack for at least 30 minutes before lifting out or slicing. An hour is even better.
Chef’s Note: The bars will look slightly soft when they first come out. They firm up completely as they cool. If you cut them warm, they will fall apart. I’ve been there. Wait.
Step 6: Slice and Serve
Lift the bars out using the parchment overhang. Place on a cutting board and slice into 9 squares (3×3) or 12 bars (3×4) depending on how generous you’re feeling.
Eat one immediately (you’ve earned it) and store the rest.
Troubleshooting & FAQs
Q: My bars fell apart completely when I cut them. What happened?
Almost certainly, they were cut too warm. The filling needs time to fully set — think of it like a fruit pie. Next time, give them the full 30–60 minutes to cool. If you refrigerate them for 20 minutes after they’ve cooled to room temperature, they’ll be even easier to slice cleanly.
Q: The filling tastes too sweet. Can I reduce the sugar?
Yes. Drop the filling sugar from 3 tablespoons to 2, especially if your strawberries are already very ripe and sweet. You can also add an extra squeeze of lemon juice to balance things out. Taste your filling before you assemble — you have full control here.
Q: Can I use strawberry jam instead of making the filling from scratch?
You can, and it’s a legit shortcut for busy weeks. Use about ¾ cup of good-quality strawberry jam. The flavor won’t be quite as bright or fresh, but the bars will still be delicious. Stir a little lemon zest into the jam to lift it up.
Q: Can I freeze these bars?
Absolutely. These are one of the best freezer breakfast options I know. See the storage section below for full details.
Storage, Reheating & Meal Prep
Room Temperature: Store in an airtight container at room temperature for up to 2 days. Keep parchment between layers so they don’t stick.
Refrigerator: They’ll keep well in the fridge for up to 5 days. The texture gets slightly firmer when cold, which honestly makes them easier to eat on the go. I actually prefer them cold.
Freezer: Wrap individual bars tightly in plastic wrap, then place them in a zip-top freezer bag. They freeze beautifully for up to 3 months. Thaw overnight in the fridge or on the counter for about an hour.
Reheating: If you want that just-baked warmth, pop a bar in the microwave for 20–25 seconds. Or warm it in a 300°F oven for about 8 minutes. Either way, it tastes remarkably fresh.
Meal Prep Tip: Make a double batch (use a 9×13 pan) on Sunday. Wrap individual bars and stack them in the fridge. Breakfast is handled for the entire week with zero morning effort.
Read — Lemon Blueberry Bars Recipe
Read — Peanut Butter Ice Cream Recipe
Read — Mango Bars with Lime Glaze
Read — Perfect Panna Cotta Recipe