I’ll be honest with you — the first time I made Thai coconut shrimp curry, I completely overcooked the shrimp. I’m talking little pink rubber erasers floating in an otherwise beautiful sauce. Tragic.
The fix? I pulled them out of the pan early, finished the sauce separately, then added them back at the very end. Game changer. Now I never skip that step, and you won’t either after reading this.
This Thai coconut shrimp curry comes together in about 30 minutes, uses one pan, and tastes like something you’d pay $22 for at a restaurant. It’s become my most-requested dinner party dish and my go-to after a long Thursday when I want something that feels indulgent without wrecking my evening.
Let’s get into it.
What Makes This Curry Actually Taste Like Thai Food
A lot of “Thai-inspired” recipes online are, respectfully, just coconut milk with some generic spices thrown in. This one isn’t.
The backbone is red curry paste — the real kind, like Mae Ploy or Maesri, which you can find at most Asian grocery stores or on Amazon. Don’t use the tiny jars from the generic supermarket aisle if you can avoid it. The flavor difference is substantial.
We’re also using fish sauce (non-negotiable), fresh lemongrass, and a hit of lime juice at the very end. That final squeeze of lime is what makes the whole dish snap into focus. Without it, it just tastes… flat.
Ingredients You’ll Need
(Serves 4)
For the Curry Base
- 2 tablespoons coconut oil (or neutral oil)
- 3 tablespoons red curry paste (Mae Ploy recommended)
- 4 garlic cloves, minced
- 1 tablespoon fresh ginger, grated
- 1 stalk lemongrass, bruised and cut into 2-inch pieces
- 1 red bell pepper, thinly sliced
- 1 medium yellow onion, sliced
For the Sauce
- 1 can (400ml) full-fat coconut milk — don’t shake the can before opening
- ½ cup low-sodium chicken or seafood broth
- 2 tablespoons fish sauce
- 1 tablespoon brown sugar (or palm sugar if you have it)
- 1 teaspoon turmeric
- Zest and juice of 1 lime
For the Shrimp
- 1.5 lbs large shrimp (21/25 count), peeled and deveined, tails on or off
- Salt and white pepper to taste
To Serve & Garnish
- Jasmine rice (always jasmine — the fragrance matters)
- Fresh Thai basil or regular basil
- Sliced red chili for heat
- Lime wedges
Equipment
- Large skillet or wok (12-inch minimum)
- Wooden spoon or silicone spatula
- Microplane for ginger and lime zest
- Small bowl for shrimp seasoning
How to Make Thai Coconut Shrimp Curry (Step-by-Step)
Step 1: Build Your Flavor Foundation
Heat your coconut oil in a large skillet over medium-high heat until it shimmers — you want it hot, not smoking.
Add the curry paste directly to the oil. This is important. Blooming the curry paste in fat rather than adding it later with the liquid is the difference between a curry with real depth and one that tastes one-dimensional. Cook it, stirring constantly, for about 60–90 seconds. The smell will be incredibly fragrant — almost smoky, with that sharp hit of dried chili and spice. That’s what you want.
Add your garlic, ginger, and lemongrass. Stir everything together for another 30 seconds.
Step 2: Sauté Your Vegetables
Toss in the onion and red bell pepper. Cook for 3–4 minutes, just until they start to soften at the edges but still have some bite. You’re not looking for fully cooked here — they’ll continue cooking in the sauce.
Step 3: Open That Coconut Milk Correctly
Here’s a trick most recipes skip: don’t shake the can. Open it, and you’ll see a thick cream layer sitting on top. Spoon that cream into the pan first and let it cook for 1–2 minutes until it slightly separates and turns golden at the edges. Then pour in the remaining coconut water and your broth.
Why? The fat in the coconut cream helps “fry” the spices a second time, adding another layer of richness. It’s a traditional Thai technique and it absolutely works.
Step 4: Season the Sauce
Stir in the fish sauce, brown sugar, and turmeric. Bring everything to a gentle simmer (not a full rolling boil — you’ll break the coconut milk) and cook for 5–6 minutes, letting the sauce reduce slightly and thicken.
Taste it. It should be rich, savory, slightly sweet, and intensely fragrant. Adjust fish sauce for saltiness, sugar for sweetness.
Step 5: Cook the Shrimp (The Most Critical Step)
Pat your shrimp completely dry with paper towels. Season lightly with salt and white pepper.
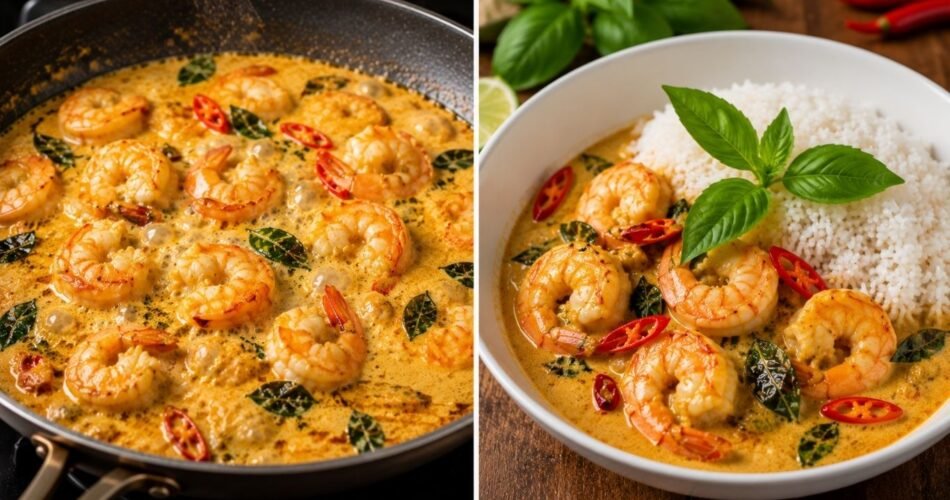
Add them to the simmering sauce in a single layer. Do not pile them on top of each other. Cook for 90 seconds on one side, flip, cook for another 60–90 seconds. The moment they curl into a loose “C” shape and turn pink throughout, pull the pan off the heat.
A tight “O” shape = overcooked. Remember that.
Step 6: Finish and Serve
Remove the lemongrass pieces. Stir in your lime zest and lime juice. Taste one more time.
Serve immediately over jasmine rice, topped with fresh basil, sliced chili, and an extra lime wedge on the side. The basil will wilt slightly from the heat of the curry — that’s perfect.
Troubleshooting: What Could Go Wrong (And How to Fix It)
My sauce is too thin.
Let it simmer uncovered for a few extra minutes before adding the shrimp. You can also stir in a teaspoon of cornstarch dissolved in cold water for a quick fix.
My sauce is too thick.
Splash in a bit more broth or even a little water, one tablespoon at a time. Don’t panic.
It tastes bland.
Nine times out of ten, this is a fish sauce issue. Add more, a teaspoon at a time. Fish sauce is your salt and your umami in this dish.
It’s too spicy.
A spoonful of brown sugar and an extra splash of coconut milk will dial back the heat without ruining the sauce.
The shrimp are rubbery.
You overcooked them. For this batch, there’s no fix — but now you know to pull them off heat even a touch earlier next time. Carry-over cooking is real.
Substitutions & Variations
Shrimp allergies? Swap in chicken breast cut into bite-sized pieces. Add it in Step 4 with the sauce and cook through — about 10–12 minutes — before finishing with lime.
Want more vegetables? Snap peas, zucchini, baby spinach, or bamboo shoots all work beautifully here. Add hearty vegetables in Step 2, delicate ones (like spinach) right before serving.
No lemongrass? Add a strip of lime zest to the sauce instead. Not identical, but it gets you in the right direction.
Coconut milk alternatives? Full-fat is genuinely best. Light coconut milk will give you a thinner, less rich sauce. It’ll still taste good, but don’t expect that restaurant-style creaminess.
Make-Ahead & Storage Tips
The curry sauce (without shrimp) can be made up to 3 days ahead and stored in the fridge. In fact, it gets better. The spices deepen overnight.
When you’re ready to eat, reheat the sauce gently over medium-low heat, then cook fresh shrimp directly in it. Takes 5 minutes.
Leftovers with shrimp already in them keep for up to 2 days in the fridge. Reheat low and slow — never microwave on full blast or your shrimp will turn to rubber.
Freezing: The sauce freezes well for up to 3 months. Shrimp, once cooked, don’t freeze particularly well in a curry. If you plan to freeze, make the sauce only and add fresh shrimp when reheating.
What to Serve With Thai Coconut Shrimp Curry
Jasmine rice is the classic choice and genuinely the best pairing. The light floral fragrance complements the coconut and lime perfectly.
Thai roti or naan if you want something to mop up that sauce (and you will want to mop up that sauce).
Cauliflower rice for a lower-carb option — it holds up well under a saucy curry.
A simple cucumber salad on the side adds a cool, crisp contrast that cuts through the richness beautifully.
Read — Lemon Blueberry Bars Recipe
Read — Homemade Chicken Noodle Soup
Read — Instant Pot Spaghetti with Meat Sauce
Read — Chicken Bacon Ranch Casserole