If you’ve ever dropped $40 on a Whole Foods Berry Chantilly Cake and thought “I could make this at home,” you’re absolutely right. And honestly? Yours will taste better.
I’ve made this Berry Chantilly Cake Recipe at least thirty times over the past five years—for birthdays, Mother’s Days, random Tuesdays when I needed something beautiful on my table. The first time I tried recreating it, I made the rookie mistake of using regular whipped cream instead of the mascarpone-cream cheese blend. It wept all over my cake stand within two hours. Never again.
This recipe is perfect for anyone who wants an impressive-looking cake without spending the entire day in the kitchen. It comes together in about 90 minutes total, and here’s the secret: you’re not making difficult buttercream or tempering chocolate. Just fluffy vanilla cake, stabilized mascarpone cream, and whatever berries look best at the market.
Why This Recipe Actually Works
The mascarpone-cream cheese combination creates stable frosting that won’t weep. Most people try making this with just heavy cream, which looks gorgeous for about an hour before it starts separating. The mascarpone adds richness and body, while a touch of cream cheese provides the structure you need for a cake that can sit at room temperature during a party.
We’re using cake flour, not all-purpose. Cake flour has lower protein content, which means less gluten development and a more tender crumb. That cloud-like texture you get in the Whole Foods version? That’s cake flour doing its thing. If you only have all-purpose, you can make a substitute (I’ll show you how below), but it’s worth keeping a box of cake flour in your pantry.
The berries get macerated with just a touch of sugar. This isn’t just for sweetness. When you toss strawberries with sugar 15-20 minutes before assembly, they release their juices and create this gorgeous berry syrup that soaks into the cake layers. It adds moisture and an extra punch of fruit flavor that makes each bite taste intensely berry-forward.
We’re not overbaking the cake layers. The difference between a good vanilla cake and a great one often comes down to three minutes in the oven. I pull mine when a toothpick comes out with just a few moist crumbs—not bone dry. The cakes will continue cooking slightly as they cool in the pans.
Cold ingredients matter for the cream. Your heavy cream, mascarpone, and even your mixing bowl should be cold. I stick my metal bowl in the freezer for 15 minutes before whipping. Cold fat whips up faster and holds its structure better. It’s the difference between soft, billowy peaks and soupy sadness.
Key Ingredients & Smart Substitutions
Cake Flour – Creates that signature tender, fine crumb. Substitute: For each cup of cake flour, use 1 cup all-purpose flour minus 2 tablespoons, then add 2 tablespoons cornstarch.
Mascarpone Cheese – Adds richness and helps stabilize the whipped cream frosting. Substitute: Full-fat cream cheese works, but add an extra tablespoon of heavy cream to keep it from being too thick.
Cream Cheese – Provides structure to the frosting so it doesn’t collapse. Don’t skip this—it’s your insurance policy.
Heavy Whipping Cream – Must be at least 36% fat for proper whipping. Substitute: There’s really no good substitute here; this is essential.
Fresh Berries – I use strawberries, blueberries, raspberries, and blackberries. Use whatever looks best, but make sure at least half are strawberries for that classic look.
Vanilla Extract – Use the real stuff, not imitation. The flavor difference is noticeable in a simple cake like this.
Sour Cream – Keeps the cake incredibly moist and adds a subtle tang. Substitute: Full-fat Greek yogurt works perfectly.
How to Make Berry Chantilly Cake
Step 1: Prep Your Pans and Preheat
Preheat your oven to 350°F (175°C). Grease two 8-inch round cake pans with butter or cooking spray, then line the bottoms with parchment paper circles.
What to look for: Don’t skip the parchment. It’s the difference between cakes that slide out perfectly and cakes you’re scraping out in chunks.
Common mistake to avoid: Greasing only the bottom. Make sure you get the sides too, or you’ll have cakes that stick and dome unevenly.
Chef’s Note: I trace the pan onto parchment paper and cut just inside the line for a perfect fit.
Step 2: Mix Your Dry Ingredients
In a medium bowl, whisk together the cake flour, baking powder, baking soda, and salt.
What to look for: Make sure there are no lumps in your cake flour. Break them up with the whisk.
Common mistake to avoid: Skipping the whisking and just dumping everything into the wet ingredients. Whisking distributes the leaveners evenly.
Step 3: Cream Butter and Sugar
In your stand mixer (or large bowl with hand mixer), beat the softened butter and sugar together on medium-high speed for 3-4 minutes until light and fluffy.
What to look for: The mixture should look pale yellow and have increased in volume. You should see it climbing up the sides of the bowl.
Common mistake to avoid: Using cold butter. It should be soft enough that your finger leaves an indent, but not greasy or melted.
Chef’s Note: This step incorporates air into your cake, so don’t rush it. Set a timer if you need to.
Step 4: Add Eggs and Vanilla
Add eggs one at a time, beating well after each addition. Scrape down the bowl, then mix in the vanilla extract.
What to look for: The mixture might look slightly curdled after adding eggs—that’s normal and will smooth out when you add the flour.
Common mistake to avoid: Adding all the eggs at once. You’ll get better emulsification by adding them one at a time.
Step 5: Alternate Dry Ingredients with Buttermilk
Add the dry ingredients in three additions, alternating with the buttermilk and sour cream mixture (mixed together beforehand) in two additions. Start and end with dry ingredients. Mix on low speed just until combined.
What to look for: Mix only until you can’t see flour streaks. The batter should be thick but pourable.
Common mistake to avoid: Overmixing after adding flour. This develops gluten and makes your cake tough. I literally count to three after the flour disappears, then stop.
Chef’s Note: I finish mixing by hand with a spatula, scraping the bottom of the bowl to make sure everything’s incorporated.
Step 6: Bake the Cakes
Divide batter evenly between your two prepared pans. Bake for 25-28 minutes, until a toothpick inserted in the center comes out with just a few moist crumbs.
What to look for: The tops should be golden and spring back when lightly pressed. The edges will just start pulling away from the pan sides.
Common mistake to avoid: Overbaking. Check at 25 minutes. Every oven runs differently, and three extra minutes can dry out your cake.
Chef’s Note: I rotate my pans halfway through baking for even browning.
Step 7: Cool Completely
Let cakes cool in pans for 10 minutes, then turn out onto wire racks, peel off parchment, and cool completely—at least an hour.
What to look for: The cakes should feel room temperature all the way through, not just on the surface.
Common mistake to avoid: Frosting warm cakes. Your beautiful whipped cream will melt into a puddle.
Step 8: Macerate the Berries
While cakes cool, hull and slice your strawberries. Toss all your berries with 2-3 tablespoons of sugar. Let sit for 15-20 minutes.
What to look for: The berries will release juice and become glossy. Save this juice—you’ll brush it on the cake layers.
Chef’s Note: I set aside the prettiest berries for decorating the top before I macerate them.
Step 9: Make the Chantilly Cream
In a very cold metal bowl, beat the cold heavy cream on medium speed until soft peaks form. Add mascarpone, cream cheese (softened), powdered sugar, and vanilla. Beat on medium-high until stiff peaks form, 2-3 minutes.
What to look for: Stiff peaks that hold their shape when you lift the beater. The cream should look thick and spreadable, not runny.
Common mistake to avoid: Overbeating. Stop as soon as you have stiff peaks, or you’ll end up with butter.
Chef’s Note: I test by turning off the mixer and lifting the whisk. If the peak stands straight up without flopping, it’s ready.
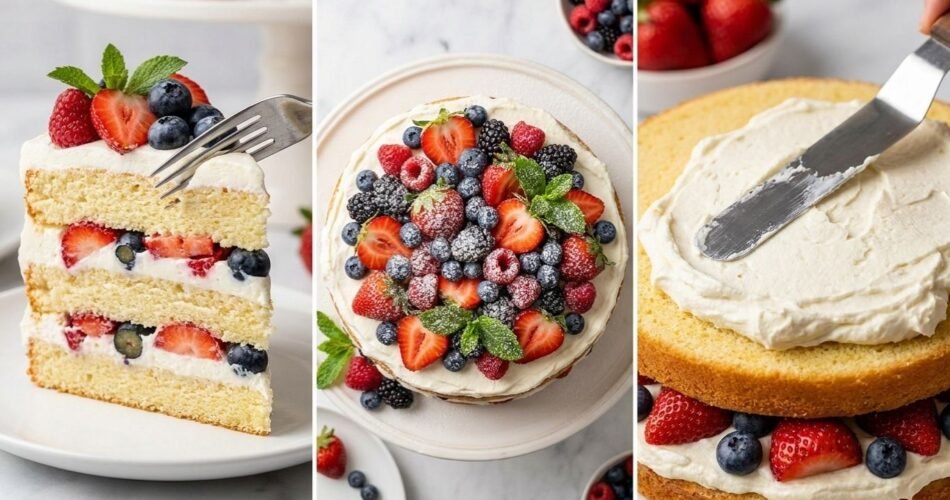
Step 10: Assemble the Cake
Place one cake layer on your serving plate. Brush with some of the berry juice. Spread about one-third of the Chantilly cream over the top. Add half of the macerated berries (drain them slightly first).
What to look for: An even layer of cream that goes all the way to the edges.
Common mistake to avoid: Using too-wet berries. Drain off most of the juice or your cake will be soggy.
Step 11: Add Second Layer and Frost
Place the second cake layer on top. Brush with more berry juice. Use the remaining cream to frost the top and sides of the cake. I like to do a “semi-naked” look where you can see the cake peeking through in spots.
What to look for: Smooth, even frosting. Use an offset spatula and long, smooth strokes.
Chef’s Note: Chill the cake for 15 minutes after the crumb coat, then add your final layer of frosting for the cleanest look.
Step 12: Decorate with Fresh Berries
Top with remaining fresh berries in whatever arrangement makes you happy. I pile them in the center for a dramatic look.
What to look for: A mix of colors and sizes. Tuck some blueberries and raspberries between the strawberries.
Common mistake to avoid: Adding berries too far in advance. They can weep and make the frosting watery. I decorate no more than 2-3 hours before serving.
Read — Chocolate Mousse Cake Recipe
Read — Strawberry Oatmeal Breakfast Bars
Read — Mixed Berry Ice Cream Recipe
Read — Strawberry Cream Crunch Cake
Troubleshooting & FAQs
Can I make this cake ahead of time?
Yes, but with limits. The cake layers can be baked, cooled, wrapped tightly in plastic, and stored at room temperature for up to two days or frozen for up to three months. The Chantilly cream holds up for about 24 hours in the fridge. I recommend assembling no more than 8 hours before serving for the best texture.
What if my Chantilly cream is too soft?
First, make sure your ingredients were actually cold. If it’s still too soft, try adding 1-2 tablespoons more cream cheese or one tablespoon of powdered sugar, which helps stabilize it. If you’ve overwhipped and it looks grainy, you’ve started making butter—there’s no fix except starting over. (I’ve been there. It’s annoying but quick to remake.)
Can I use frozen berries?
Not for decorating—they’ll be too mushy. But you can use thawed, well-drained frozen berries for the filling layer in a pinch. Just make absolutely sure they’re drained, or you’ll have a soggy middle.
Why did my cake dome in the middle?
Oven temperature too high or uneven baking. Use an oven thermometer to check your actual temp. You can also use baking strips (wet fabric strips wrapped around the pan) to promote even baking. If your cakes still dome, just level them with a serrated knife before assembling.
Storage, Reheating, and Meal Prep
Storage: This cake needs to be refrigerated because of the cream cheese-based frosting. Cover loosely with plastic wrap or a cake dome and refrigerate for up to 3 days. The berries will release more juice over time, so it’s definitely best within the first 24 hours.
Freezing: I don’t recommend freezing the assembled cake—the berries and cream don’t freeze well. But you can freeze the unfrosted cake layers for up to 3 months. Wrap each layer tightly in plastic wrap, then aluminum foil. Thaw overnight in the fridge before assembling.
Meal Prep Tips: Bake your cake layers the day before. Once cooled, wrap them well and leave them at room temperature. Make your Chantilly cream the morning of serving and keep it in the fridge. Assemble the cake 2-4 hours before your event for the freshest taste and prettiest presentation.
Serving Tip: Take the cake out of the fridge 20-30 minutes before serving. It tastes so much better at cool room temperature than fridge-cold.