I’ll never forget the first time I tried making chocolate mousse cake for my sister’s birthday. The mousse deflated into a puddle, the cake was dry, and I almost cried into what was supposed to be an elegant dessert.
That was eight years ago. Since then, I’ve made this chocolate mousse cake at least 50 times, and I’ve cracked the code.
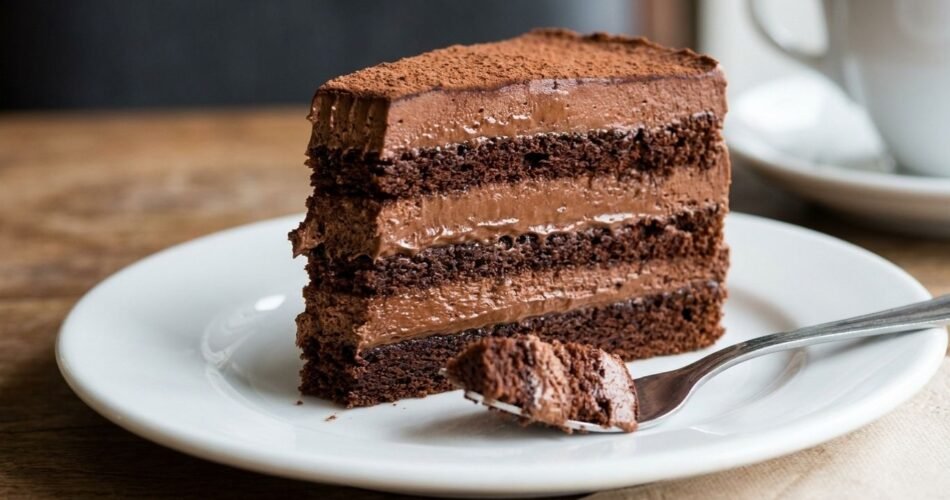
This isn’t one of those recipes where you need a pastry degree or fancy equipment. You need two bowls, a hand mixer, and about 30 minutes of active work. The result? A showstopping dessert with a dense chocolate cake base and a cloud-like mousse layer that literally melts on your tongue.
Perfect for birthdays, dinner parties, or when you need to impress your in-laws (trust me on this one). And here’s the best part: you can make it a day ahead, so you’re not scrambling when guests arrive.
Why This Chocolate Mousse Cake Recipe Actually Works
After testing this recipe more times than I care to admit, here’s what makes it foolproof:
We’re using melted chocolate, not cocoa powder, in the mousse. This creates an incredibly silky texture that cocoa-based mousses just can’t match. The fat content in real chocolate gives you that luxurious mouthfeel.
The cake layer is intentionally dense. We’re not making a fluffy layer cake here. This base needs to support the mousse without getting soggy, which is why we’re using a brownie-style batter with less leavening. It holds up like a dream.
Room temperature eggs are non-negotiable. Cold eggs won’t whip to the same volume, and your mousse will be dense instead of airy. I learned this the hard way during attempt number three.
We fold, never stir. When you combine the whipped cream with the chocolate, aggressive stirring deflates all those air bubbles you worked so hard to create. Gentle folding keeps the mousse light.
The cake chills for at least 4 hours. I know you’re excited, but this isn’t optional. The mousse needs time to set properly, and the flavors actually deepen as it sits. Day-old chocolate mousse cake is somehow even better than fresh.
Key Ingredients & Smart Substitutions
For the Cake Layer:
- All-purpose flour – Provides structure without making the cake too cakey; you can use 1:1 gluten-free baking flour with good results
- Dutch-processed cocoa powder – Creates a darker, richer chocolate flavor than natural cocoa
- Espresso powder – Amplifies chocolate flavor without making it taste like coffee (don’t skip this!)
- Granulated sugar – Sweetens and helps create that slightly crispy top crust
- Eggs – Bind everything together and add richness
- Butter – Use unsalted so you control the salt level; coconut oil works in a pinch but changes the flavor slightly
- Vanilla extract – Use pure, not imitation, for best flavor
For the Mousse Layer:
- Dark chocolate (60-70% cacao) – The star of the show; don’t go higher than 70% or it’ll be too bitter, don’t go lower than 60% or it’ll be too sweet
- Heavy whipping cream – Must be at least 36% fat to whip properly; coconut cream works for dairy-free but has a distinct coconut taste
- Powdered sugar – Dissolves instantly into the cream (granulated won’t work here)
- Gelatin (optional) – I don’t use it, but if you’re nervous about the mousse holding its shape, 1 teaspoon of unflavored gelatin will help
How to Make Chocolate Mousse Cake
Step 1: Prep Your Pan & Preheat
Preheat your oven to 350°F (175°C). Line an 8-inch or 9-inch springform pan with parchment paper and grease the sides.
What to look for: The parchment should lie flat on the bottom with no wrinkles that’ll create texture on your cake.
Common mistake: Using a regular cake pan. You need a springform pan to release this cleanly because of the mousse layer. Don’t have one? Use an 8-inch square pan lined completely with parchment with overhang for lifting.
Chef’s Note: I run the parchment under water for a second, shake off excess, and then press it into the pan. The moisture helps it stick and lie flat.
Step 2: Make the Cake Batter
Whisk together 3/4 cup flour, 1/2 cup cocoa powder, 1 teaspoon espresso powder, 1/2 teaspoon baking powder, and 1/4 teaspoon salt in a medium bowl.
In a separate large bowl, beat 2 eggs with 3/4 cup sugar until pale and thick (about 2 minutes with a hand mixer). Melt 1/2 cup butter and let it cool for 2 minutes, then mix it into the eggs along with 1 teaspoon vanilla.
Gently fold the dry ingredients into the wet until just combined.
What to look for: The batter should be thick and glossy, like brownie batter. A few small lumps are fine.
Common mistake: Overmixing once you add the flour. This develops gluten and makes the cake tough instead of fudgy. Mix until you just don’t see streaks of flour anymore, then stop.
Step 3: Bake the Base
Pour batter into your prepared pan and smooth the top. Bake for 18-22 minutes.
What to look for: The edges will pull away slightly from the pan, and a toothpick inserted in the center should come out with a few moist crumbs (not wet batter, but not completely clean either).
Common mistake: Overbaking because you’re waiting for a clean toothpick. Remember, this is a fudgy base, not a regular cake. If the toothpick is clean, you’ve gone too far.
Chef’s Note: Start checking at 18 minutes. My oven runs hot, so mine’s done at 19 minutes every time. Know your oven.
Step 4: Cool Completely
Let the cake cool in the pan for 15 minutes, then remove the springform ring and let it cool completely on a wire rack (about 1 hour).
What to look for: The cake should be completely cool to the touch, not even slightly warm.
Common mistake: Adding mousse to a warm cake. This melts the chocolate in your mousse and creates a sad, soupy mess. Been there, ruined that.
Step 5: Melt the Chocolate
Chop 8 ounces of dark chocolate into small, even pieces. Melt it in a double boiler or in the microwave in 20-second bursts, stirring between each.
Let it cool to room temperature (about 10 minutes).
What to look for: The chocolate should be smooth and glossy, completely melted with no lumps. When you test the temperature, it should feel neutral on your wrist, not warm.
Common mistake: Adding warm chocolate to whipped cream. This deflates the cream instantly and can even cause the fat to separate. Patience here pays off big time.
Chef’s Note: I use the microwave at 50% power. Full power scorches chocolate faster than you’d think.
Step 6: Whip the Cream
In a very cold bowl (I stick mine in the freezer for 10 minutes), beat 2 cups of heavy cream with 1/4 cup powdered sugar until stiff peaks form.
What to look for: When you lift the beaters, the cream should hold firm peaks that don’t droop. It should look thick and billowy.
Common mistake: Overwhipping. If your cream starts to look grainy or separated, you’ve made butter. Stop when you hit stiff peaks, not a second later.
Step 7: Combine Chocolate & Cream
Take about 1/3 of your whipped cream and fold it gently into the cooled melted chocolate. This lightens the chocolate and makes it easier to fold in the rest.
Add the chocolate mixture back into the remaining whipped cream and fold gently until no white streaks remain.
What to look for: A uniformly brown mousse with a light, airy texture. It should still look fluffy, not dense.
Common mistake: Stirring instead of folding. Use a rubber spatula and cut down through the center, sweep along the bottom, and bring it up the side. Rotate the bowl and repeat. It takes longer but preserves all that air.
Chef’s Note: It’s okay if you see a few tiny streaks. They’ll disappear as the mousse sets. Better slightly undermixed than deflated from overmixing.
Step 8: Assemble & Chill
Place your cooled cake layer back in the springform pan (or your lined square pan). Pour the mousse over the top and smooth it with an offset spatula.
Cover with plastic wrap and refrigerate for at least 4 hours, preferably overnight.
What to look for: The mousse should spread easily but hold its shape when you make swirls with the spatula.
Common mistake: Skimping on chill time. The mousse needs those hours to firm up properly. At 2 hours it’s still too soft to slice cleanly.
Step 9: Serve Like a Pro
Run a knife under hot water, wipe it dry, and make your first cut. Wipe the knife clean and reheat it between each slice.
What to look for: Clean slices with distinct layers. The mousse should be set but still creamy, not stiff like Jello.
Chef’s Note: I top each slice with a tiny pinch of flaky sea salt right before serving. The salt contrast makes the chocolate sing.
Troubleshooting & FAQs
Q: My mousse didn’t set. What happened?
Most likely, your chocolate was too warm when you folded it in, which melted the whipped cream. The mousse needs the structure from properly whipped, cold cream to set. You can try re-chilling for a few more hours, but if it’s been 8+ hours and still soupy, the emulsion broke. Next time, let that chocolate cool completely.
Q: Can I make this ahead?
Absolutely. This is actually better when made 1-2 days ahead. The flavors meld and the texture becomes even silkier. Keep it covered in the fridge for up to 3 days.
Q: Can I freeze chocolate mousse cake?
You can, but the texture changes slightly. The mousse can become a bit grainy when thawed. If you do freeze it, wrap individual slices tightly in plastic wrap, then foil. Thaw overnight in the fridge. It’s still delicious, just not quite as silky as fresh.
Q: What if I don’t have a springform pan?
Use an 8-inch square pan completely lined with parchment paper, leaving overhang on all sides. After chilling, lift the whole thing out using the parchment, then slice. It won’t look as fancy but tastes identical.
Q: Why did my cake layer sink in the middle?
Either you overmixed the batter (developing too much gluten, which then contracts as it cools) or you opened the oven door too early. Don’t peek until at least 15 minutes in.
Q: Can I use milk chocolate instead of dark?
You can, but it’ll be very sweet. I’d reduce the powdered sugar in the mousse to 2 tablespoons instead of 1/4 cup. Personally, I think dark chocolate creates better balance.
Storage, Reheating, and Meal Prep
Storage: Keep covered in the fridge for up to 4 days. The mousse layer makes this unsuitable for room temperature storage—it needs to stay cold.
Freezing: Wrap the whole cake (or individual slices) tightly in plastic wrap, then aluminum foil. Freeze for up to 2 months. Thaw overnight in the refrigerator before serving.
Reheating: You don’t reheat this cake—it’s served chilled. Take it out of the fridge about 10 minutes before slicing to make cutting easier, but serve it cold.
Make-Ahead Strategy: This is the perfect make-ahead dessert. I always prepare it the day before I need it. The cake layer can even be baked 2 days ahead, wrapped, and refrigerated until you’re ready to make the mousse.
Meal Prep Tip: Portion individual slices and store them in airtight containers. They’ll keep for 3-4 days, making this a fancy weekday treat when you need a pick-me-up.
Read — Best Banana Muffin Recipes
Read — Strawberry Oatmeal Breakfast Bars
Read — Mixed Berry Ice Cream Recipe
Read — Strawberry Cream Crunch Cake