The first time I made this Strawberry Cream Crunch Cake, I served it at my sister’s birthday and watched three grown adults go completely silent mid-bite. Not polite silence. The kind where they’re genuinely processing what just happened in their mouths.
That crunch. That cream. Those strawberries.
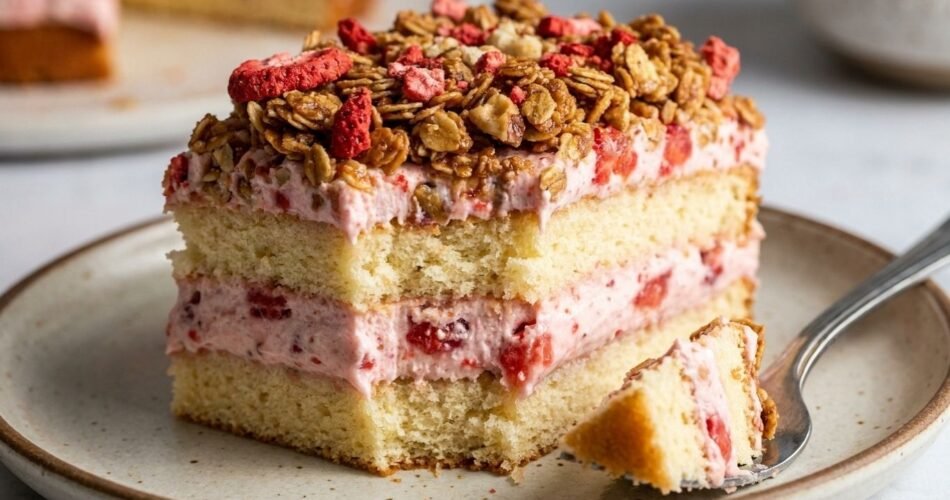
It’s the combination that nobody expects but everybody immediately wants again. You get soft, pillowy sponge, cold whipped cream that’s just barely sweet, jammy fresh strawberries, and then — that golden crunch layer hits. It’s textural chaos in the best possible way.
I’ll be honest: my first attempt was a disaster. The cream was too loose (I hadn’t chilled my bowl), the crunch layer turned soggy within an hour, and the whole thing slid sideways when I tried to slice it. It looked like a dessert crime scene.
But after about a dozen test runs, I cracked the formula. Now it holds beautifully, slices cleanly, and tastes like something from a patisserie window — except you made it in your home kitchen for a fraction of the cost.
This recipe is perfect for birthdays, summer gatherings, baby showers, or honestly any Tuesday when you want to do something that makes people feel genuinely special. You don’t need to be an advanced baker. You need patience, cold ingredients, and this guide.
Why This Strawberry Cream Crunch Cake Actually Works
Most strawberry cream cakes online are either too fussy or they fall apart the moment you look at them wrong. Here’s what makes this version different.
1. The Crunch Layer Is Sealed, Not Exposed
The golden cookie crumble sits between layers of cream — not on top where it’ll absorb moisture and turn to paste within an hour. This keeps it crispy for hours, even in the fridge.
2. We Macerate the Strawberries
Tossing sliced strawberries with a little sugar and letting them sit for 15 minutes pulls out their natural juices and deepens their flavor dramatically. You’re essentially creating a quick strawberry compote situation without the cooking. Raw strawberries on their own can taste flat inside a cake. Macerated ones? Intensely jammy.
3. Stabilized Whipped Cream Is Non-Negotiable
Plain whipped cream deflates. Fast. Adding a small amount of cream cheese (or powdered gelatin if you prefer) gives the cream structure so it holds for 24–48 hours without weeping or collapsing. This is the single biggest game-changer I discovered on attempt number three.
4. The Sponge Is Brushed With Syrup
A simple sugar syrup brushed onto the sponge layers keeps the cake moist even after a night in the fridge. Dry cake is the enemy. This one thin step separates a “pretty good” result from a “how is this homemade” result.
5. Everything Is Cold Before Assembly
Cold cream, cold bowl, even briefly chilling the cake layers — this isn’t paranoia. Temperature control is how you get those clean, defined layers when you slice it. Warm cream smears. Cold cream holds.
Key Ingredients & Smart Substitutions
All-purpose flour — Provides structure for the sponge. For gluten-free, swap with a 1:1 gluten-free baking flour blend.
Eggs (room temperature) — Critical for volume in the sponge. Cold eggs don’t whip properly and you’ll get a dense, sad cake. Pull them out 30 minutes before you start.
Heavy whipping cream (cold) — Has to be at least 36% fat content to whip properly. Lower fat cream just won’t hold peaks.
Full-fat cream cheese (softened) — This is the stabilizer for the whipped cream. Neufchâtel works if that’s what you have. Skip the low-fat stuff.
Fresh strawberries — Please use fresh here, not frozen. Frozen thaw into mush and will make your cream layers wet. If strawberries aren’t in season, fresh raspberries work beautifully.
Golden Oreos (or vanilla sandwich cookies) — Crushed into the crunch layer. You can also use shortbread cookies or vanilla wafers. Graham crackers work but give a slightly different flavor profile — more cheesecake-adjacent, which isn’t bad at all.
Granulated sugar + powdered sugar — Granulated goes into the sponge and macerated strawberries. Powdered goes into the cream (it dissolves smoothly without grittiness).
Vanilla extract — Use real vanilla if you can. The cream layer is where vanilla really shines.
Simple syrup (water + sugar) — Made in 5 minutes on the stovetop. Don’t skip it.
How to Make Strawberry Cream Crunch Cake
Step 1: Make the Simple Syrup First
Combine equal parts sugar and water (½ cup each) in a small saucepan over medium heat. Stir until sugar dissolves completely — about 3 minutes. Add a splash of vanilla extract, remove from heat, and let it cool completely.
What to look for: Clear liquid, no graininess when you rub it between your fingers.
Common mistake: Using it warm. Warm syrup will partially cook your cake and make it gummy. It must be at room temperature before brushing.
Step 2: Bake the Sponge Cake Layers
Preheat your oven to 350°F (175°C). Grease and line two 8-inch round cake pans.
Whip your room-temperature eggs and granulated sugar together on high speed for 5–7 full minutes until the mixture is pale, thick, and has roughly tripled in volume. This is the foundation of your light sponge — don’t rush it. Gently fold in sifted flour in three additions using a rubber spatula. Fold in melted (but cooled) butter last.
Divide evenly between your pans and bake for 22–25 minutes until a toothpick comes out clean and the top springs back when lightly pressed.
What to look for: A pale golden top that pulls slightly away from the edges of the pan.
Common mistake: Opening the oven before 20 minutes. That temperature drop causes the sponge to sink in the middle.
Chef’s Note: Let the layers cool completely in the pans for 10 minutes, then turn out onto wire racks. Once fully cool, wrap them in plastic wrap and refrigerate for at least 30 minutes before assembly. Cold cake layers are infinitely easier to work with.
Step 3: Macerate the Strawberries
Slice 1½ pounds of fresh strawberries. Toss with 2 tablespoons of granulated sugar and let them sit in a bowl for 15–20 minutes. You’ll see the juices pool at the bottom — that’s exactly what you want.
Common mistake: Using the pooled juices directly on the cake. Drain them off first, otherwise the cream layers will get wet.
Step 4: Make the Stabilized Whipped Cream
Beat softened cream cheese on medium speed until completely smooth with no lumps — about 2 minutes. Add powdered sugar and vanilla extract and mix until combined.
In a separate cold bowl (I stick mine in the freezer for 10 minutes), whip the cold heavy cream to soft peaks. Then add the cream cheese mixture and continue whipping until you reach firm, stable peaks.
What to look for: The cream should hold a peak that stands straight up without drooping. If it droops, keep whipping in 20-second bursts.
Common mistake: Overwhipping past firm peaks into grainy, butter-adjacent territory. Watch it closely once it starts thickening.
Step 5: Make the Crunch Layer
Crush your golden Oreos (about 16–18 cookies) into a rough crumble — some fine, some chunky. Mix with 3 tablespoons of melted butter until it resembles wet sand.
Chef’s Note: Don’t pulverize the cookies to a fine powder. You want actual texture here. Uneven crumble = better crunch in every bite.
Step 6: Assemble the Cake
Place your first chilled sponge layer on your serving plate or cake board. Brush generously with the cooled simple syrup.
Spread a thick layer of stabilized whipped cream (roughly ⅓ of it). Add a single layer of drained macerated strawberries. Sprinkle half the crunch mixture evenly over the strawberries.
Top with the second sponge layer. Brush with more syrup. Spread another thick layer of cream over the top and sides. Arrange fresh strawberry halves decoratively on top. Press the remaining crunch around the bottom edge of the cake for that signature golden border.
Refrigerate for at least 2 hours before slicing.
Common mistake: Assembling and immediately slicing. The cream needs time to firm up and the layers need time to “marry.” That 2-hour wait is doing real work.
Troubleshooting & FAQs
Q: My whipped cream came out runny. What happened?
Almost always a temperature issue. Your cream wasn’t cold enough, or your bowl was warm. Stick the bowl and beaters in the freezer for 10 minutes and try again. Also double-check that your cream is at least 36% fat.
Q: The crunch layer went soggy. How do I prevent this?
Make sure your strawberries are well-drained before layering, and ensure the cream layer underneath the crunch is thick enough to act as a barrier from moisture. Also — assemble within 4 hours of serving for maximum crunch.
Q: Can I make this ahead of time?
Yes. You can bake the sponge layers up to 2 days ahead and refrigerate them wrapped in plastic. Assemble the day before your event and refrigerate. The crunch will soften slightly by day two, but the flavor is still excellent.
Q: Can I freeze the finished cake?
You can freeze individual slices on a baking sheet until solid, then wrap tightly. Thaw in the fridge overnight. The cream texture changes slightly — it’s still good, but best enjoyed fresh.
Storage, Reheating, and Make-Ahead Tips
In the fridge: Store covered (or in a cake dome) for up to 3 days. The crunch softens after day one but the flavor actually deepens.
In the freezer: Individual slices can be frozen for up to 6 weeks. Wrap each slice in plastic wrap, then foil. Thaw overnight in the refrigerator.
Make-ahead strategy: Bake sponge layers Saturday morning. Assemble Saturday evening. Serve Sunday. That’s the sweet spot for flavor, structure, and crunch.
This cake does not need reheating — it’s served cold, straight from the fridge. Pull it out 10–15 minutes before serving if you want the cream to soften very slightly.
Read — Best Banana Muffin Recipes
Read — Strawberry Oatmeal Breakfast Bars
Read — Mixed Berry Ice Cream Recipe
Read — Strawberry Cheesecake Ice Cream