Here’s the thing about panna cotta — it sounds intimidatingly fancy, and that’s exactly what makes it so perfect.
You say “panna cotta” at a dinner party and people immediately assume you spent hours in the kitchen. The truth? This panna cotta recipe takes about 10 minutes of actual work. The fridge does everything else.
I made my first panna cotta for a dinner party back in 2014. It was supposed to be the elegant, effortless finale to an Italian-themed meal. Instead, it slid out of the ramekin in one sad, rubbery chunk that bounced slightly when it hit the plate. My guests were polite. I was mortified.
That disaster sent me down a months-long obsession with getting the gelatin ratio exactly right. And I did. This is the recipe that came out the other side of all that testing.
This recipe is perfect for anyone who wants a make-ahead dessert that looks stunning, tastes incredible, and genuinely requires minimal effort. It’s ideal for dinner parties, date nights, holiday tables, or honestly, just a Tuesday when you want something special.
Why This Panna Cotta Recipe Actually Works
There are thousands of panna cotta recipes online. Most of them get at least one thing wrong. Here’s what makes this one different.
1. The Gelatin Ratio Is Everything
Too much gelatin and you get that rubbery, bouncy texture — my 2014 nightmare. Too little and it won’t set. The sweet spot is 2¼ teaspoons (one standard packet) of unflavored gelatin per 2 cups of cream. This gives you a panna cotta that just barely holds its shape — it should wobble like a gentle wave when you tap the glass or plate. That’s exactly what you want.
2. Bloom Your Gelatin Properly (Don’t Skip This)
Blooming means sprinkling the gelatin over cold liquid and letting it sit for 5 minutes before heating. This step lets the gelatin granules fully absorb moisture so they dissolve smoothly and evenly. Rush this step and you’ll end up with little chewy granules in your finished dessert. Not cute.
3. Never Boil the Cream
Heat your cream mixture to just barely a simmer — you want to see wisps of steam and small bubbles forming around the edges of the pan. A rolling boil will break down the gelatin’s setting power AND scorch the cream. Low and slow is the move here.
4. Full-Fat Everything, Always
This is not the dessert to swap in half-and-half or light cream. The fat content in heavy cream is what gives panna cotta that signature luxurious, velvety texture. You can use whole milk for a small portion of the liquid if you want it slightly lighter, but never go below that.
5. The Vanilla Matters More Than You Think
A real vanilla bean makes a noticeable difference here. Because the ingredient list is so short, every single component has nowhere to hide. Those little black specks aren’t just for looks — they’re pockets of intense vanilla flavor. That said, good quality pure vanilla extract works beautifully too. Imitation vanilla? Hard pass.
Key Ingredients & Smart Substitutions
Heavy cream (2 cups / 480ml) — The backbone of the recipe. Use full-fat. No substitutions for the main quantity, though you can swap up to ½ cup with whole milk to lighten the texture slightly.
Whole milk (1 cup / 240ml) — Balances the richness of the cream. For dairy-free, use full-fat canned coconut milk in place of both the cream and milk — it’s genuinely delicious and slightly tropical.
Granulated sugar (¼ cup / 50g) — Plain white sugar works perfectly here. Honey or maple syrup can substitute at a 1:1 ratio for a different flavor profile.
Unflavored gelatin (2¼ tsp / 7g / 1 packet) — Knox is the most widely available brand in the US. For vegetarian/vegan versions, use agar-agar powder — but note the ratio changes (start with ¾ tsp agar-agar per 2 cups liquid, as it sets firmer).
Vanilla bean (1 whole, or 1½ tsp pure vanilla extract) — This is your primary flavor. Spend a little extra on a good one.
Pinch of fine sea salt — Just a pinch. It sharpens the sweetness and rounds out the flavor. Don’t skip it.
Step-by-Step Instructions
Step 1: Bloom the Gelatin
Pour the cold whole milk into a medium saucepan. Sprinkle the gelatin evenly over the surface of the milk.
Don’t stir it. Just let it sit for 5 full minutes. You’ll see the gelatin absorb the milk and become slightly wrinkled and swollen. That’s exactly right.
Step 2: Prepare the Vanilla
While the gelatin blooms, split your vanilla bean lengthwise with a sharp paring knife and use the back of the blade to scrape out all those tiny seeds. Set both the seeds and the pod aside.
Chef’s Note: The pod still has tons of flavor — add it right into the cream mixture and fish it out before pouring.
Step 3: Heat the Cream Mixture
Add the heavy cream, sugar, salt, vanilla seeds, and vanilla pod to the pan with the bloomed gelatin.
Place the pan over medium-low heat. Stir gently and consistently as it heats. You’re looking for that barely-there simmer — steamy, with small bubbles just beginning to form around the edges. This takes about 4-5 minutes.
Do not walk away. At this temperature, things can escalate to a boil quickly.
Step 4: Dissolve the Gelatin Completely
Once the mixture is hot and steaming, continue stirring for about 2 minutes to make sure every last bit of gelatin has fully dissolved. To test, dip a spoon in and hold it up to the light — you shouldn’t see any granules on the spoon.
Remove the vanilla pod and discard it (or rinse and dry it to make vanilla sugar — zero waste!).
Step 5: Pour and Set
Remove from heat. If you see any small lumps, strain the mixture through a fine-mesh sieve into a large measuring cup — the pour spout makes life so much easier here.
Pour the mixture into your chosen vessels: individual ramekins, wine glasses, dessert glasses, or silicone molds if you plan to unmold them.
Chef’s Note: If you want to unmold the panna cotta for a dramatic plated presentation, lightly grease your ramekins with a neutral oil (like grapeseed or a flavorless cooking spray) before pouring. If you’re serving in glasses, skip the greasing entirely.
Let the panna cottas cool at room temperature for 20 minutes, then cover loosely with plastic wrap and refrigerate.
Step 6: Chill Until Set
Refrigerate for a minimum of 4 hours. Overnight is even better. The panna cotta will firm up gradually — don’t be tempted to check it at 2 hours and assume it failed.
Chef’s Note: Making these the day before you need them is genuinely ideal. The texture actually improves overnight.
Step 7: Unmold or Serve
If serving in glasses: Pull straight from the fridge, add your topping, and serve. Done.
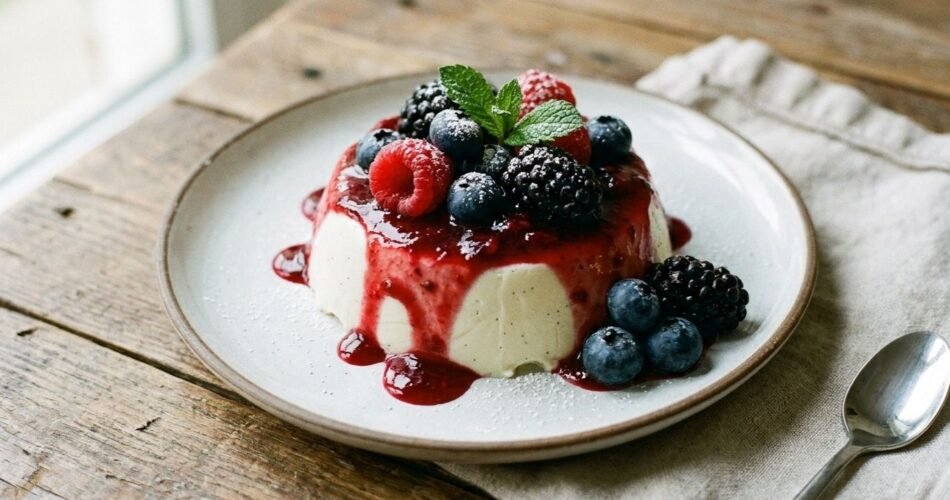
If unmolding: Run a thin knife or offset spatula carefully around the edge of each ramekin. Place your serving plate face-down on top of the ramekin, then flip the whole thing in one confident motion. Tap the bottom gently. It should release with a satisfying little thwump.
Top with fresh berry coulis, macerated strawberries, a drizzle of salted caramel, or just some fresh fruit. Simple is usually best.
Troubleshooting & FAQs
My panna cotta didn’t set. What happened?
Nine times out of ten, this means the gelatin didn’t fully dissolve, or the mixture never got hot enough to activate it. If your panna cotta is still liquid after 4 hours, gently re-warm it in a saucepan, check that it’s fully smooth, and re-pour into clean ramekins to reset. It’s rescuable.
My panna cotta is too rubbery and firm. How do I fix it?
You likely used too much gelatin or let the mixture get too hot. Unfortunately, the texture can’t be undone once set, but you can learn for next time: measure your gelatin carefully and pull the cream off the heat the moment you see steam and edge-bubbles. For your current batch, chop the rubbery panna cotta and layer it into a parfait with whipped cream — problem solved.
Can I make panna cotta ahead of time?
Absolutely — this is one of the best things about this dessert. You can make panna cotta up to 3 days in advance and keep it covered in the refrigerator. Just add the toppings right before serving so they stay fresh and vibrant.
Can I freeze panna cotta?
Technically yes, but I’d strongly advise against it. Freezing causes the gelatin structure to break down, and when it thaws, the texture becomes grainy and weepy. Just make it fresh — it’s so easy, there’s really no need to freeze it.
Storage, Reheating & Make-Ahead Tips
Refrigerator storage: Cover each panna cotta with plastic wrap (press it gently against the surface if it’s in a ramekin, or just drape over a glass) and refrigerate for up to 3 days.
Freezer: Not recommended. See the FAQ above.
Reheating: You don’t reheat panna cotta — it’s served cold. That’s literally the best part. Pull it from the fridge about 5 minutes before serving so it’s not ice-cold (slightly below room temp lets the flavor come forward more fully).
Make-ahead strategy for entertaining: Make these up to 2 days before your event. Keep them covered in the fridge. Prep your toppings (coulis, fresh fruit, caramel) the morning of your event and store them separately. Assemble right before serving. This is genuinely stress-free entertaining at its finest.
Check — Mixed Berry Ice Cream Recipe
Check — Key Lime Pie Ice Cream
Check — Homemade Peppermint Ice Cream
Check — Mango Fruit Ice Cream