I’ll be honest with you. The first time I tried making quesadillas for a crowd, I ended up trapped at the stovetop for 45 minutes, flipping one tortilla at a time while everyone else sat at the table getting restless and hungry. My second quesadilla was burnt. My fourth was soggy. It was a disaster.
Then I discovered the sheet pan method. And I genuinely haven’t gone back.
These chicken sheet pan quesadillas are everything a weeknight dinner should be — fast, crispy, genuinely satisfying, and almost impossible to mess up. You build them directly on a sheet pan, press them flat, bake them in a screaming-hot oven, and walk away. The oven does all the heavy lifting.
This recipe is perfect for busy weeknights, feeding a hungry crowd, or meal prepping lunches for the week. If you’ve got 10 minutes of prep and a bag of shredded chicken, you’re basically already done.
Why This Recipe Actually Works (And Why Others Don’t)
There’s a reason most sheet pan quesadilla recipes feel a little “meh.” They skip a few small details that make a massive difference. Here’s what makes this version consistently great.
1. A Preheated Sheet Pan = Instant Crispiness
This is the single biggest game-changer. Sliding your assembled quesadilla onto a pan that’s already hot causes the bottom tortilla to start crisping the second it makes contact. That sizzle? That’s the sound of success. Cold pan into a hot oven just steams the tortilla instead of crisping it.
2. The Right Cheese Ratio
Too little cheese and your quesadilla falls apart when you cut it. Too much and you get a greasy, sliding mess. A solid ¾ cup per large tortilla — spread in an even layer all the way to the edges — gives you that perfect cheese pull and acts like the glue that holds everything together.
3. Brush, Don’t Skip, the Oil
Lightly brushing the top tortilla with a little neutral oil before it goes into the oven is what gives you that beautiful, crackly, golden-brown top. It’s a small step. It makes a huge difference.
4. Don’t Overfill
I know it’s tempting. More filling sounds like more flavor. But a thick, stuffed quesadilla won’t press flat, won’t crisp evenly, and will absolutely fall apart when you try to slice it. Keep the filling layer thin and even.
5. Let It Rest Before Slicing
Two minutes. That’s all it takes for the cheese to set back up slightly so your slices stay intact. Cut immediately out of the oven and everything slides out. Patience pays off here.
Key Ingredients & Smart Substitutions
Here’s what you’ll need and why each ingredient matters.
Flour Tortillas (Large, 10-inch)
Large tortillas fold over into a perfect half-moon shape that fits neatly on a standard sheet pan. Gluten-free? Use your favorite GF flour tortilla — they crisp up beautifully in a hot oven.
Shredded Rotisserie Chicken
Pre-cooked rotisserie chicken is the weeknight MVP here — it’s already seasoned, already tender, and takes zero extra effort. Vegetarian? Swap it for black beans, roasted sweet potato, or a mix of both.
Sharp Cheddar Cheese
The sharpness cuts through the richness of the chicken and fat from the cheese. Dairy-free? A good melting vegan cheese like Violife or Daiya works fine — just add it a little more generously.
Pepper Jack Cheese
Mixing in some pepper jack adds a subtle heat that keeps things interesting without overwhelming. Leave it out if you’re cooking for kids — all cheddar is totally great.
Diced Green Chiles (Canned)
These little guys add moisture, mild heat, and a slight tang that makes the filling taste way more complex. Swap for fresh jalapeño if you want more heat.
Cumin, Smoked Paprika, Garlic Powder
This trio seasons the chicken mixture without overpowering it. Don’t skip the smoked paprika — it adds a low, warm, slightly BBQ-ish depth that’s subtle but noticeable.
Olive Oil or Avocado Oil
For brushing the top tortilla. Either works. Avocado oil has a higher smoke point if you’re going extra hot.
Salt & Pepper
Season as you go. Taste your filling before it goes in.
Step-by-Step Instructions
Step 1: Preheat and Prep Your Pan
Preheat your oven to 425°F (220°C). Place a large rimmed sheet pan (half sheet, 18×13 inch) in the oven while it preheats. This is non-negotiable — that hot pan is your crispiness secret.
Step 2: Make the Chicken Filling
In a bowl, combine 2 cups shredded rotisserie chicken, 1 can (4 oz) diced green chiles (drained), ½ teaspoon cumin, ½ teaspoon smoked paprika, ¼ teaspoon garlic powder, salt, and pepper to taste. Give it a good stir.
Chef’s Note: If your rotisserie chicken is a little dry, add a tablespoon of salsa or sour cream into the filling mix. It adds just enough moisture without making things soggy.
Step 3: Assemble the Quesadillas
Lay two large flour tortillas out flat on your counter. On one half of each tortilla, spread:
- A generous layer of shredded cheddar and pepper jack (about ¾ cup total)
- A thin, even layer of the chicken mixture
- Another light sprinkle of cheese on top of the chicken
Fold the empty half of each tortilla over the filling to create a half-moon shape. Press down gently with your palm.
Chef’s Note: Cheese on the bottom AND top of the filling is intentional. The bottom layer melts and sticks to the tortilla. The top layer acts as glue to keep the chicken in place.
Step 4: Move to the Hot Pan
Carefully pull your preheated sheet pan out of the oven (use good oven mitts — it’s genuinely very hot). Lay your folded quesadillas on the pan. You’ll hear that satisfying sizzle immediately.
Lightly brush the tops of the tortillas with olive or avocado oil.
Chef’s Note: If you want to do more than 2 quesadillas at once, use two sheet pans and rotate them halfway through.
Step 5: Bake
Bake for 8 minutes, then flip each quesadilla carefully using a wide spatula. Bake for another 5-6 minutes until both sides are deeply golden and the edges are crisped.
Chef’s Note: Every oven runs differently. At 7 minutes, peek in. You want golden, not dark brown. Once you’ve made this once, you’ll know exactly when yours is done.
Step 6: Rest and Slice
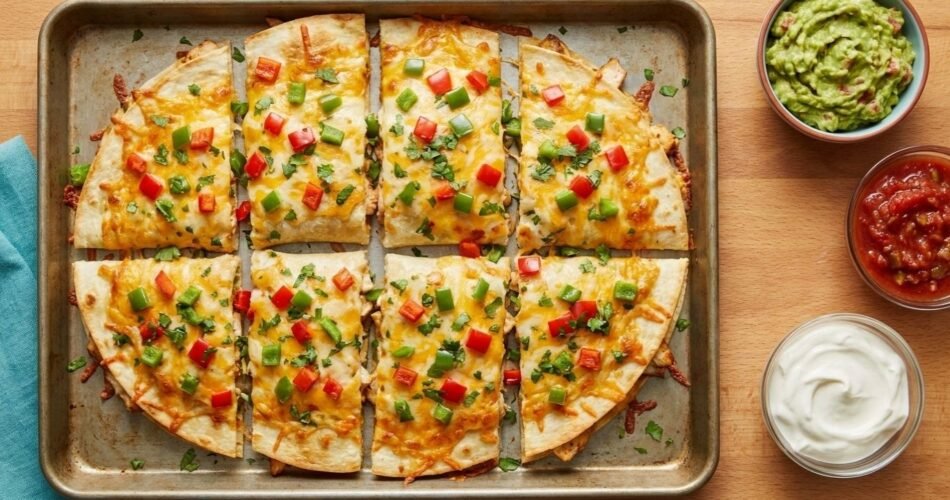
Pull them out. Let them sit for 2 full minutes on the pan. Then use a sharp knife or pizza cutter to slice each half-moon into 3-4 triangles.
Serve immediately with salsa, guacamole, sour cream, or whatever makes you happy.
Troubleshooting & FAQs
Q: My quesadillas came out soggy. What happened?
Two likely culprits. Either your pan wasn’t preheated (cold pan = steamed, not crisped tortilla), or your filling had too much moisture. Make sure your green chiles are well-drained and your chicken isn’t wet.
Q: Can I make these ahead of time?
You can assemble them (unfilled and uncooked) up to 4 hours ahead and keep them in the fridge. Bake them right before serving. Already-baked quesadillas are fine as leftovers but won’t be quite as crispy as fresh.
Q: Can I freeze them?
Yes — once baked and cooled, wrap individual slices in foil or parchment and freeze in a zip bag for up to 2 months. Reheat from frozen in a 375°F oven for 10-12 minutes. They won’t be quite as crispy as fresh, but they’re still very good.
Q: My cheese isn’t melting all the way through. What’s wrong?
Your filling layer is probably too thick, or your oven temperature is running low. Make sure your filling is spread thin and your oven is fully preheated before the pan goes in. An oven thermometer is worth buying if you bake frequently — most home ovens run 25-50°F off.
Storage, Reheating, and Meal Prep
In the Fridge: Store leftover quesadilla slices in an airtight container for up to 3 days. They’re honestly still pretty good cold if you’re into that sort of thing (no judgment).
Reheating — The Right Way: Skip the microwave if you can help it. A microwave will make your tortilla chewy and sad. Instead, pop slices into a preheated 375°F oven for 8-10 minutes, or lay them in a dry skillet over medium heat for 2-3 minutes per side. The skillet method is faster and gives you that re-crisped tortilla.
Freezer: As mentioned above — wrap, bag, freeze for up to 2 months. Reheat from frozen in the oven at 375°F for 10-12 minutes.
Meal Prep Tip: Make a big batch of the seasoned chicken filling on Sunday and refrigerate it. Throughout the week, you can throw these together in under 15 minutes flat.
Check — Mango Fruit Ice Cream
Check — Bruschetta Pasta Salad Recipe
Check — Rosa Marina Fruit Salad Recipe
Check — Tangy Fried Pickles Ranch Dip