There’s something magical about that first bite of Key Lime Pie—the perfect balance of tart citrus, creamy sweetness, and buttery graham cracker crust. Now imagine all those beloved flavors transformed into a silky, scoopable ice cream that tastes like summer in a cone.
This Key Lime Pie Ice Cream recipe is the culmination of three summers of testing in my kitchen. After making 47 (yes, I counted!) batches, I’ve finally cracked the code for ice cream that captures every element of the classic dessert: bright lime flavor, velvety texture, and those essential crunchy graham cracker bits.
Whether you own an ice cream maker or prefer a no-churn method, this recipe works beautifully either way. Let me show you exactly how to make it.
Why This Recipe Works
After years of perfecting homemade ice cream recipes, I’ve learned what separates good ice cream from exceptional ice cream. Here’s the science behind this recipe’s success:
The Perfect Texture Formula
- High-fat content: Using both heavy cream and sweetened condensed milk creates a luxuriously smooth base that resists ice crystal formation
- Cream cheese addition: This secret ingredient adds tang and body, mimicking the filling of authentic Key Lime Pie
- Optimal sugar ratio: Sweetened condensed milk provides just enough sugar to keep the ice cream scoopable without being overly sweet
Authentic Key Lime Flavor
- Fresh lime juice: Essential for that signature tartness
- Lime zest: Contains aromatic oils that bottled juice simply can’t provide
- Proper acid balance: The acidity of lime juice actually enhances the perception of creaminess
The Graham Cracker Solution
Most recipes fail by mixing graham crackers directly into the base, resulting in a soggy mess. My method involves:
- Pre-toasting the crumbs with butter for enhanced flavor
- Adding them as a ripple at the end to maintain crunch
- Using the right crumb-to-cream ratio for perfect bites
Ingredients You’ll Need
Scroll down for exact measurements in the recipe card
For the Ice Cream Base:
- Heavy Whipping Cream (2 cups) – Must contain at least 36% fat. This is non-negotiable for smooth texture.
- Sweetened Condensed Milk (14 oz can) – Provides sweetness and prevents iciness. I prefer organic brands when possible.
- Cream Cheese (4 oz) – Full-fat only. Low-fat versions will make the ice cream grainy.
- Fresh Lime Juice (½ cup) – From about 10-12 Key limes or 4-5 regular Persian limes.
- Lime Zest (2 tablespoons) – Zest before juicing! Use a microplane for best results.
- Pure Vanilla Extract (1 teaspoon) – Enhances all the other flavors.
- Fine Sea Salt (¼ teaspoon) – Balances sweetness and brightens lime flavor.
For the Graham Cracker Swirl:
- Graham Crackers (1 cup crushed) – About 7-8 full crackers.
- Unsalted Butter (3 tablespoons, melted) – Helps the crumbs toast and stay crunchy.
- Light Brown Sugar (2 tablespoons) – Adds caramel notes.
- Ground Cinnamon (¼ teaspoon) – Optional, but traditional for graham crusts.
Optional Additions:
- Green food coloring – Just 1-2 drops for that classic Key Lime Pie appearance
- Vodka or rum (1 tablespoon) – Keeps ice cream softer (alcohol doesn’t freeze solid)
How to Make Key Lime Pie Ice Cream
Step 1: Prepare the Graham Cracker Swirl (10 minutes)
Why we do this first: The graham crackers need to cool completely before adding to the ice cream, or they’ll melt the base.
- Crush the crackers: Place graham crackers in a zip-top bag and crush with a rolling pin until you have a mix of fine crumbs and pea-sized pieces. You want texture, not powder.
- Toast for flavor: In a medium skillet over medium heat, melt the butter. Add the graham cracker crumbs, brown sugar, and cinnamon. Stir constantly for 4-5 minutes until golden and fragrant.
- Cool completely: Spread the mixture on a parchment-lined plate and refrigerate while you make the ice cream base.
Pro Tip: Don’t skip the toasting step! Raw graham crackers will become soggy in the ice cream. Toasted crumbs stay crunchy for days.
Step 2: Create the Lime Base (15 minutes)
- Zest first, always: Use a microplane to remove the bright green zest from your limes. Stop when you hit the white pith (which is bitter). You need 2 tablespoons.
- Extract maximum juice: Roll limes firmly on the counter before cutting—this breaks down the internal membranes and releases more juice. Cut in half and juice with a citrus reamer or squeeze by hand. Strain out seeds.
- Blend the base: In a large mixing bowl, beat the softened cream cheese with an electric mixer until completely smooth and fluffy (about 2 minutes). This prevents lumps in your final ice cream.
- Add condensed milk gradually: Pour in the sweetened condensed milk in a steady stream while mixing on medium speed. Beat until fully incorporated.
- Mix in lime and vanilla: Add the lime juice, lime zest, vanilla extract, and salt. Mix on low speed until uniform. The mixture will look slightly curdled—this is normal and won’t affect the final texture.
Important Note: The acid in the lime juice causes slight curdling when it hits the dairy. This is expected and will smooth out when combined with whipped cream.
Step 3: Whip and Fold (10 minutes)
- Chill your equipment: For best results, place your mixing bowl and beaters in the freezer for 10 minutes before whipping cream.
- Whip to stiff peaks: Pour the cold heavy cream into the chilled bowl. Beat on medium speed for 30 seconds, then increase to high. Whip for 3-5 minutes until stiff peaks form. When you lift the beaters, the cream should stand straight up without drooping.Testing for stiff peaks: Turn the bowl upside down over your head. If you’re confident enough to do this, you have stiff peaks. (Just kidding—but the cream shouldn’t move if you tilt the bowl.)
- Fold gently: Add about ⅓ of the whipped cream to the lime mixture and stir vigorously to lighten it. Then add the remaining whipped cream and fold gently with a rubber spatula. Use a cutting and turning motion, scraping from the bottom of the bowl. Stop when you no longer see white streaks.
Why folding matters: Stirring deflates the air bubbles we just spent time creating. Folding preserves air, which makes the ice cream light and scoopable.
Step 4: Churn Method (25 minutes active + 6 hours freezing)
If you have an ice cream maker:
- Pre-freeze bowl: Ensure your ice cream maker bowl has been frozen for at least 24 hours.
- Churn: Pour the ice cream base into your machine and churn according to manufacturer instructions (typically 20-25 minutes). The ice cream should look like thick soft-serve and pull away from the sides of the bowl.
- Add graham crackers: In the last 2 minutes of churning, add the cooled graham cracker mixture gradually. Or, for more distinct layers, proceed to layering.
- Layer and swirl: Transfer half the churned ice cream to a freezer-safe container (I use a metal loaf pan or shallow plastic container). Sprinkle half the graham cracker mixture over it. Add remaining ice cream, then remaining crackers. Use a butter knife to swirl through the layers in a figure-8 motion. Don’t over-swirl or you’ll lose the ripple effect.
- Freeze firm: Press parchment paper directly onto the surface of the ice cream (prevents ice crystals), cover with lid or plastic wrap, and freeze for at least 6 hours or overnight.
Step 5: No-Churn Method (10 minutes active + 8 hours freezing)
If you don’t have an ice cream maker:
- Skip the churning: After folding the whipped cream into the lime base, the mixture is already properly aerated for no-churn ice cream.
- Layer in container: Spread ⅓ of the ice cream mixture into a freezer-safe loaf pan. Sprinkle with ⅓ of the graham cracker mixture. Repeat layers twice more.
- Marble: Use a butter knife or skewer to gently swirl the layers together. Make 5-6 figure-8 motions—don’t overdo it.
- Freeze with protection: Press parchment paper directly on the surface, cover tightly with plastic wrap and then aluminum foil (double protection prevents freezer burn). Freeze for at least 8 hours.
- Prevent crystals: For the smoothest texture, after 1 hour of freezing, remove from freezer and stir vigorously with a fork to break up any ice crystals. Return to freezer immediately. Repeat once more after another hour.
No-churn vs. Churned: The churned version will be slightly lighter and smoother, but the no-churn method is remarkably close and requires no special equipment.
Storage and Serving Suggestions
How to Store
- Container: Use a shallow, airtight container rather than a tall one. Ice cream freezes more evenly in thin layers.
- Freezer location: Store in the back of the freezer where temperature is most stable, never in the door.
- Shelf life: Best within 1 week, good for 2 weeks, safe for up to 2 months.
Serving Tips
- Softening: Let ice cream sit at room temperature for 5-10 minutes before scooping. The ideal serving temperature is 6-10°F (-14 to -12°C).
- Scoop secrets: Dip your ice cream scoop in hot water between scoops for easier curls.
- Portion size: A standard serving is ½ cup (about 4 oz).
Serving Suggestions
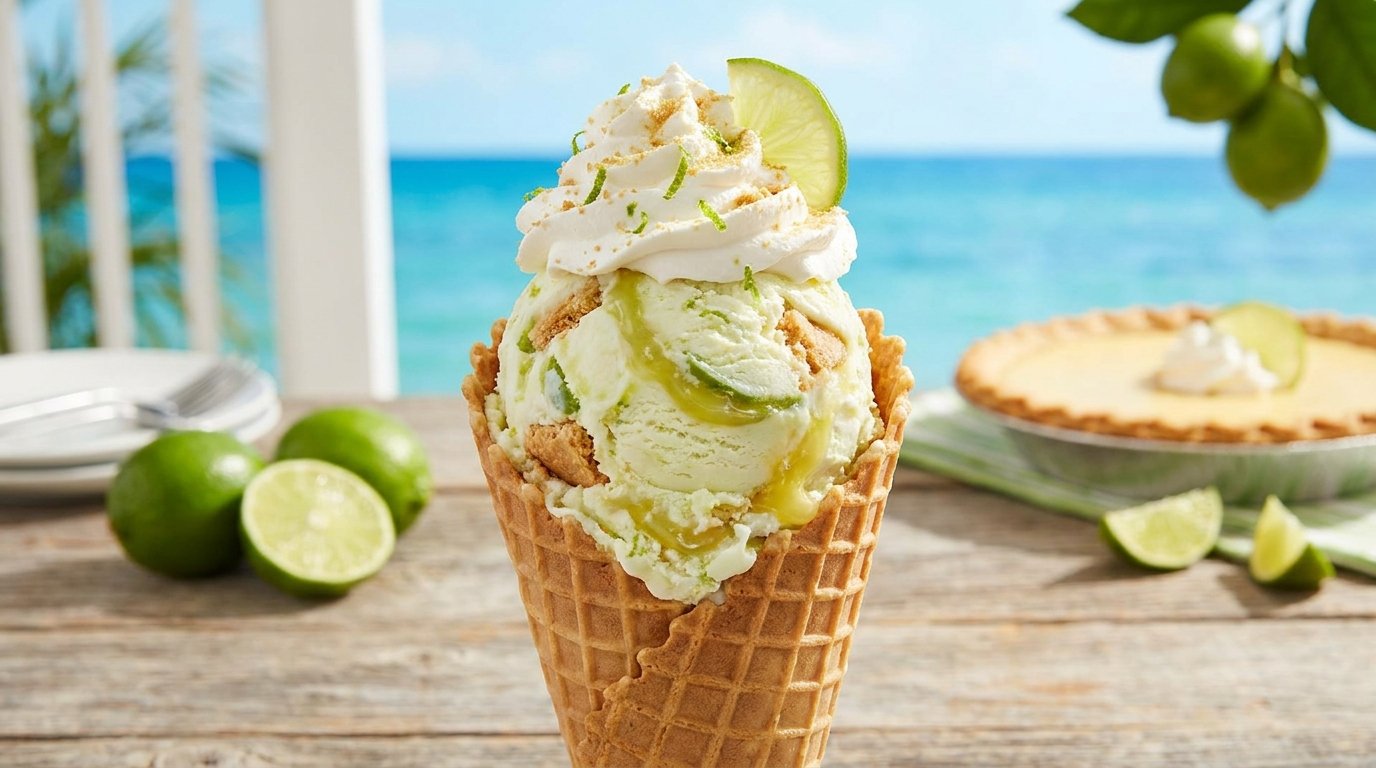
- Classic cone: Serve in waffle cones with extra graham cracker crumbs on top
- Ice cream pie: Press into a graham cracker crust, freeze, and slice like pie
- Float: Add a scoop to lemon-lime soda or ginger ale
- Affogato twist: Pour a shot of hot espresso over a scoop for citrus-coffee magic
- Sandwich: Place between two soft sugar cookies
- Parfait: Layer with whipped cream and fresh berries
Garnish Ideas
- Candied lime slices
- Toasted coconut flakes
- Fresh mint leaves
- White chocolate shavings
- Meringue cookies
- Extra lime zest